How to recover WhatsApp messages deleted by the sender

How to recover WhatsApp messages deleted by the sender

"Imagine your phone gets a WhatsApp notification, and as soon as you open the app, the message gets deleted by the sender. Sounds frustrating? Indeed it is!"

WhatsApp keeps bringing new updates keeping its users in mind. You too must have used many new WhatsApp features. Like WhatsApp had launched a new feature some time ago through which you can delete the messages sent through WhatsApp.

Many times, we unknowingly send or forward a message to someone on WhatsApp. Therefore, a feature was launched by WhatsApp through which you can delete such messages within 7 minutes. After which it gets completely deleted from the front.

But many people want to know whether they can see deleted messages on WhatsApp . So let us tell you that this can be done that you can see WhatsApp deleted messages and also read them.

Today we are going to tell you about two methods using which you can read WhatsApp deleted messages. Therefore, if you want to know how to see WhatsApp deleted messages, then read this post carefully once.

We are going to tell you about two ways to view WhatsApp deleted messages. With the help of which you can see deleted WhatsApp messages. In the two methods that we are going to tell you, you can see the WhatsApp delete message by installing the application or without installing the application, so let's know how to do it.

WhatsApp delete message seen By application

If you want to easily see WhatsApp deleted messages, then you have to download and install an application for this. After which, if someone deletes the message after sending it to you, then you can easily see it with the help of the application.

The name of this application is Notification History which saves every notification coming in your mobile and prepares a Notification History of it. From here you can read all your notification messages.

Actually, you get many apps for this purpose in Google Play Store. But the one we are telling you about is widely used for this. Because this app has been downloaded by more than 1 million people, so let us know how to use it.


Step- 1
First of all install the app named “Notification History” from your play store or install it by clicking on the button below.


Step- 2
As soon as you open the “Notification History” app after installing it, the screen opens like the photo shown below.


Step- 3
Now you see two options. “ Enable ” both Accessibility Service-disable and Notification Access-disable options and click on ok button.

Step- 4
Now you can see and read WhatsApp deleted messages with the help of this app. If someone deletes a message after sending it, then by opening this app you can read that message.

WhatsApp delete message seen By without application

Now we are telling you about how you can see WhatsApp deleted messages without installing any application because many people want to see WhatsApp deleted messages without installing any application, so let us know.

How to recover deleted WhatsApp messages with WA Deleted Messages?

Wondering about how to recover deleted WhatsApp messages? Some third-party applications might help you in reading the deleted chats and WhatsApp media, making a simple choice a backbreaking task.

However, if you are looking for a sure-shot way to get the job done right, look no further and install WA Deleted Messages right away on your device. This app is a one-stop destination to fetch all the deleted WhatsApp messages in no time.

It is a fast and easy approach to safely recovering your missing chats, videos, audio, and other media files.

Features of WA Deleted Messages
  • Transfer WhatsApp data & WhatsApp Business data between Android and iPhone devices while keeping the highest security level.
  • Recover WhatsApp messages deleted by the sender in just simple clicks.
  • WhatsApp Web to log in your WhatsApp account on different devices at the same time.
  • Easily operate and keep your data safe.
  • Offers an easy-to-use interface and is thus beginner-friendly.

WhatsApp delete message seen By without application

Step- 1
For this, first of all you have to uninstall your WhatsApp.

Step- 2
Now install your WhatsApp again.

Step- 3
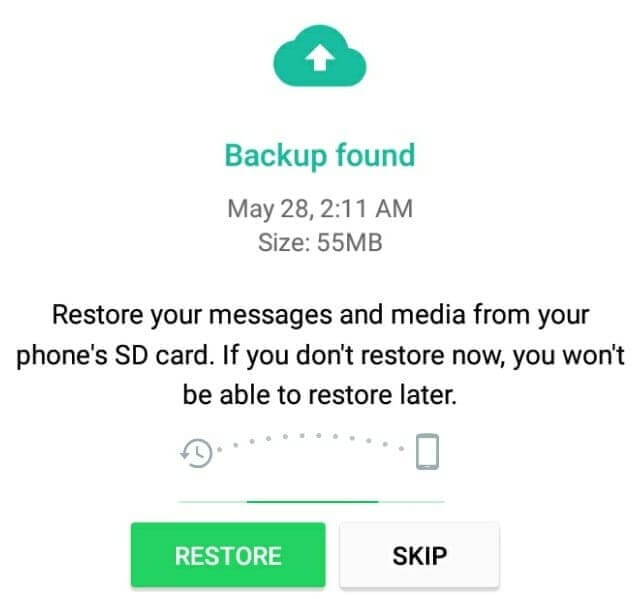
As soon as you install WhatsApp, you see the option of chat backup “ Restore”, click on it.


Step- 4
From here you get backup up to 7 days. So in this way you can see the deleted message of WhatsApp.

So friends, we have told you about two ways to view and read WhatsApp deleted messages. You can use whatever method you find easier. So we hope this post has been helpful and useful for you. Please share this with your friends
How to Boost Your Google AdSense CPC and Earnings

How to Boost Your Google AdSense CPC and Earnings

There are many ways to earn money from a blog and usually money is earned from the blog by placing advertisements and Google Adsense is most used for placing advertisements on the blog, but if the Google Adsense CPC and Google Adsense Revenue of your blog is very low. If so then it remains a matter of concern for you.

Because every blogger wants to earn money from his/her blog but even after doing a lot of hard work, he earns very little money, the main reason for which is the reduction of Google AdSense CPC.

Because the increase or decrease of your Google AdSense Revenue largely depends on it, if the Google AdSense CPC of your blog is high then you are able to earn good money from your blog, hence it is very important for the Google AdSense CPC of the blog to be high.

When we create a blog and put Google Adsense advertisements on it, initially Google Adsense CPC is low and especially in India it is generally low but Google Adsense CPC can be increased, for this first of all you need to know about Google Adsense CPC, CTR. It is very important to know about CPM.
All Heading Show

Google Adsense CPC

The full name of CPC is Cost Per Click i.e. when someone clicks on the advertisement shown on your blog by Google AdSense, you get money according to every click and how much money you get is called CPC i.e. Cost Per Click.

The higher the Google Adsense CPC of your blog, the higher is the Google Adsense revenue. You can check your daily blog CPC by going to your Google AdSense account.

Google AdSense CTR

The full name of CTR is Click Through Rate, which means what percentage of all the advertisements shown by Google on your blog are clicked. For example, 100 advertisements are shown by Google on your blog and they are clicked 10 times. If clicked then Blog CTR is 10 percent.

Google AdSense CPM

This is also an important factor to increase Google AdSense Revenue, whose full name is Cost Per Thousands. It tells how much money is paid by Google AdSense for 1000 impressions on your blog, hence the higher the CPM, the more money you will get from Google AdSense. Revenue increases.

How to increase Google AdSense CPC

In India, Hindi Blog CPC is generally very low, due to which Google AdSense Revenue is also very low because we get paid for clicking on advertisements. In such a situation, if Blog CPC is low then we get very less money.

Therefore, it is important for our blog's CPC to be high, so we are going to tell you about some methods using which you can increase the CPC of your blog.

New Google AdSense

If you have recently installed Google ads on your blog, then it is natural that you are given low CPC in the beginning, this is normal.

But if you start your blog by targeting a country where the currency value is high then you get high CPC like United States, Australia, Canada, Marshall islands, United Kingdom, Germany, Switzerland etc.

Organic Traffic

To earn money from any blog, the most important thing is to have traffic on that blog, therefore, without traffic, there is no benefit in placing advertisements on the blog because until there is no one to see the advertisements on your blog, you will not be able to make money by placing advertisements on the blog. Can't earn money.

Initially you get traffic from Social Media on which you get low CPC, hence try to get maximum organic traffic lane on the blog, that is, if someone comes to your blog through Search Engine, then you get high CPC.

Therefore, search engine optimize your blog which helps you in getting organic traffic and this is a means by which you can bring thousands and lakhs of visitors to your blog every day.

Google AdSense Ads Size

It is very important that you choose the right ads size on your blog because you get Google AdSense CPC according to the type and size of ads you place on the blog.

Now this does not mean that you should go to the blog of any big blogger and create exactly the same ads and put them on your blog because it is not necessary that you will also get high CPC from them.

Therefore, it is very important to use ads size and ads location properly. We are telling you about those ads sizes using which you can increase Blog CPC.

-Half Page Large Skyscraper (300×600)

-The Leaderboard (728×90)

-The Medium Rectangle (300×250)

-Large Rectangle (336×280)

-Large Mobile Banner (320×100)

-Mobile Leaderboard (320×50)

-Wide Skyscraper (160×600)


-Portrait (300×1050)

-The Billboard (970×250)

-The Square (250×250)

These ads are most used to increase Blog CPC. You can also increase the Google AdSense CPC of your blog by creating this type of Ads unit.

Create New Ads Unit

When we get Google AdSense Approval on our blog, then we create an ads unit and keep using the same ads unit for many years.

Therefore, if the CPC of your blog is very low, then you can create new ads units and place them in place of the old ads units. Even by doing this, the blog CPC increases.

Experiment With Google ads

Many bloggers look at other blogs and place similar ads on their blogs, but it is not necessary that similar ads help in increasing the earnings of your blog and the methods that other bloggers use to increase Blog CPC are applicable on your blog. Work too.

Therefore, you have to experiment with Google Adsense ads on your blog, it does not mean that you should tamper with the Google ads code in any way.

Rather, you have to experiment on Google ads size and ads location to see if you place any type of ads and where you get good CPC. In this way, you can find out the right type of ads and location for your blog.

Link ads vs Display ads

Many people believe that Link ads give more money than Display ads but we believe the opposite because Display ads are more attractive and the advertiser has to pay more money to Google for it, hence the chances of clicking on Display ads are higher. You get more money than link ads.

But it is true that Link Ads get more clicks as compared to Display Ads, due to which Link ads earn more money, but if you are able to get clicks on Display ads in the same manner, then Blog CPC and Google AdSense Revenue will increase. There is a lot of expansion.

Use Minimum Ads

Most of the new blogs use a lot of ads on their blog due to which Blog CPC becomes low, hence you should use 4-5 ads on your blog.

Apart from this, you can also use Google auto ads which makes your blog professional and also helps in increasing Blog CPC and from time to time Google keeps providing many types of features which can be used to increase the publisher's earnings. This helps in increasing Google Revenue.

Write Quality Content With Keywords

Quality and Unique Content helps a lot in ranking your blog in Google, which gives you very good traffic as well as CPC and also you can increase Google AdSense CPC by using High CPC Keywords. By keeping some other things in mind, you can increase Google Adsense CPC and Google Adsense Revenue of your blog like-

-Mobile Friendly website

-Fast Laoding Website

-Increase CTR

-Increase Domain & Page authority

-Increase Search Engine Traffic

-Write Long Articles

– Proper keyword Researching

– Use Responsive Ads

-Choose Best Niche for Blogging

By using these methods you can increase the CPC of your blog and increase Google Adsense Revenue . We hope you liked our post.

If you like our post and found it helpful then do share it with your blogger friends and if you have any question then comment us.
How to Unblock Facebook Website URL 2024 Method

How to Unblock Facebook Website URL 2024 Method

Facebook which is a popular social network website , or if you want to promote any website then Facebook is a great option to bring traffic to the website.

If you use Facebook then you must have known that we can also share Website/Blog Post on Facebook.

So if you are trying to share any of your websites on Facebook, but you are not able to share your website URL on Facebook, it means that Facebook has blocked your website for some reason.

If your website is blocked on Facebook, or you are searching for the solution of how to unblock a website from Facebook then you have come to the right post, now I am sharing the method which is working for you in 2024.
How to unblock a website from Facebook

Before knowing how to unblock a website from Facebook, first see why Facebook blocks any website.

You will know that Facebook community guidelines are very strict, if they feel even a little wrong then they block them immediately which is necessary for any good social network site so that their users are not troubled. .

Why is Facebook ID blocked or what to do about it, I have already shared it in detail, first of all read it completely, then you will understand what to do if your website is blocked..

Facebook blocks which site:If the website is spammy then it is blocked.

Even if someone shares the URL of a website anywhere, that site is blocked.

If a FB user has any problem with our website then the url is blocked.

If there is some illegal content on the site then the url is blocked.

Apart from what is in the title or image of the website, if there is anything else on the website which is driving the user crazy then the website is blocked if such information is found on the website.

Even if the design of the website is not good, the website can be blocked.

Even if some wrong script is running on the website, the website is blocked.

Facebook Community Standards No Authenticity: Whatever content is there on the website is genuine so that the user does not get any wrong information.

Safety: The website should be safe for the users.
Privacy: User data should not be leaked in any way on the website.
Dignity: There should be no wrongdoing to any person or religion in the website.

Whatever URL you are sharing, if it agrees with any of these posts then you cannot share that URL on 

Facebook. Spammy popups appear on the website.

The website is trying to copy some top brand.
There is any wrong information in the website which may harm the user.
If the URL has been previously taken from a similar account, that account is wrong in the eyes of Facebook.

Or if you want to know in detail then you have to read Facebook Community Standards . In which he has clearly stated that if anyone wants to use Facebook then what should be kept in mind.

So let's talk about how to unblock a website from Facebook, before going ahead in the unblock process, you have to check that you are not violating any of their policies, if so. First of all you have to do it right.

Unblock Website on Facebook 2024 method

First of all you have to check whether your website is blocked on Facebook, for that you go to Facebook Debug tool, or search for your website.
Facebook Debug
Unblock Facebook Website URL [year] Method - Blogging
If you search any website in the debug tool, if that website is blocked on Facebook, you will get an error message.
Unblock Facebook Website URL [year] Method - Blogging


If you are getting this error even after searching your website, it means your website is blocked on Facebook, now your first step is to understand that you have read the Facebook Community Standards carefully, or according to them, you should pay less attention to your website. correct.

Once you confirm that there is no problem with your website, Facebook has blocked your website by mistake, click on the Let us Know link given at the end of the error message and submit your details.

Unblock Facebook Website URL [year] Method - Blogging


After writing your reason in the form, you have to send it, now Facebook team will review your website and if they feel that they will unblock your website, after which you will be able to share your website on Facebook.

You must also read how to get traffic from Facebook on your blog , I have shared the right ways to get traffic from Facebook.

At Last:

I have shared this method with you to unblock your website from Facebook, it works, but you cannot tell us how much time it will take..

Earlier there was an option of a direct form on Facebook, with the help of which we could directly unlock the Facebook URL, but now they have removed it.

Hope this information will definitely help you, or if your website is blocked on Facebook then you will be able to unblock it.. or if your website is not blocked then how to save it from being blocked, you will also keep this in mind.

If you have any question or suggestion related to the information given in the post, please tell us in the comments.. or if this information is useful to you then please tell us so that we can come further for you or provide better information.
How to Use WhatsApp without a Phone Number [100% Work Method]

How to Use WhatsApp without a Phone Number [100% Work Method]

WhatsApp is a popular messaging app that allows users to communicate with others worldwide over the internet. We all know WhatsApp strictly requires a valid phone number; there are instances where users may seek alternative methods to use WhatsApp without sharing their primary phone number. Follow this guide; we provide four effective methods to use WhatsApp without a phone number.

1. Can You Use WhatsApp without a Phone Number?

Yes. Actually, you can use WhatsApp without your personal phone numbers. It's no secret that WhatsApp only lets you sign up via a phone number linked to your smartphone. The first time you run WhatsApp, the app asks for your phone number to receive a one-time verification code. You can start using WhatsApp immediately if you have the same phone number and the associated SIM in your smartphone. But if you don't want to register for WhatsApp with a private phone number, here are four proven ways to use WhatsApp without a phone number, such as WhatsApp's feature linked devices, registering with a landline number to authenticate WhatsApp, using temporary/virtual numbers Instead of a phone number to verify your account, or using a Google Voice number

2. How to Use WhatsApp without Phone Number?

Some individuals may attempt to use WhatsApp without a phone number for various reasons; if you don't have a phone number or you are considering privacy and security when you are using WhatsApp with a personal phone number, you can follow the next 4 proven methods to use the WhatsApp with a landline or a temporarily generated number provided by a third-party app. Let us examine each one in more detail.

Method 1: Via Linked Devices

With the feature of WhatsApp Linked devices, it can also be linked to another smartphone account, such as a second smartphone, without needing a phone number. Using WhatsApp Web on a tablet or second phone without a phone number is an alternative to setting up WhatsApp with a phone number. This is how it works:

Step 1. Open your web browser and enter the URL web.whatsapp.com.

Step 2. launch WhatsApp on your primary device. Click the three-dot symbol in the top right corner or Settings and choose "Link Devices."

Step 3. click on Link a Device to scan the QR code. This allows you to use WhatsApp on your second device without providing a phone number. This option, however, is only available through the browser. Dual-device use of the app is not possible. WhatsApp Web is also an alternative option.
Method 2: Using Landline Number to Access WhatsApp

WhatsApp support to using a landline number to register a WhatsApp business account. The following steps will guide you through the process of verifying WhatsApp using a landline number:

Step 1. Download WhatsApp on your device and launch the app to get started. It will be recommended to uninstall and then reinstall WhatsApp if you are already using it.

Step 2. On the WhatsApp verification interface, input the fixed landline number and country code, then click "Next."

Step 3. WhatsApp will send an SMS code, but you will not receive it. Wait 1 minute until the SMS process fails, then click "Call me."

Step 4. When you receive the call on your landline number, enter the numbers you hear. In this way, the number will be verified automatically.

With this method, you can successfully verify WhatsApp using a landline number. Verification is only a one-time process, so you will never have to worry about it again.

Method 3: Using TextNow to verify WhatsApp

If you do not have access to a landline number, you can verify WhatsApp with a temporary or virtual number. TextNow is one of several services that provide temporary or virtual numbers. Besides working on Android devices, it is also compatible with iPhones. Use TextNow to verify WhatsApp as following steps:

Step 1. Download the TextNow app for Android or iPhone. The application will provide you with several virtual numbers based on your area code.

Step 2. Then launch WhatsApp. You will be prompted to enter the virtual number you selected from TextNow in the verification window.

Step 3. You can choose "Call me" once the SMS verification process fails. At the same time, make sure TextNow is running in the background.

Step 4. Fill out the WhatsApp verification code and finish the process. As soon as the verification code is provided, you will receive a phone call on your TextNow number.

Using this method of a temporary or a virtual number, you can easily access your WhatsApp account without a phone number.

Method 4: Using Google Voice Number

Most people can benefit from having a Google Voice Number. It's essential for those who receive international calls frequently. You may like to use WhatsApp with the number for more privacy.

Google Voice Numbers might be unfamiliar to you. Rather than replace your actual number, Google gives you an alternative number that you can use instead. Google Voice gives you a free and permanent phone number based on your Google account. You can use this number to make calls, send texts, leave voicemails, and more.

It is currently only available to US and Canadian Google users. A Google Voice number can be associated with two different accounts. A personal account can handle all your calls, while a business account can handle all your calls. Upon receiving the number, it is yours for life. Google Voice numbers are simple for WhatsApp, so don't worry about how to do it. Initially, you'll need an original number that you can use to link your alternative Google Voice number. Then you're ready to go. Follow the steps below to get started.

Step 1. Download Google Voice and WhatsApp. Both applications are easily available on App Store and the Google Play Store.

Step 2. Sign up and get a Google Voice Number.

Step 3. Verify Google Voice Number with actual number. Choose a phone that you can access, type its number, and click Send code.

Step 4. Set up WhatsApp with Google Voice Number.

If you have already set up WhatsApp with your number, you need to reinstall it. Delete the app and reinstall it from your phone's app store. You can find WhatsApp under the application tab in your phone's Settings.
Here's a step-by-step guide to setting up your WhatsApp with the Google Voice Number.

Let's open WhatsApp now. Choose the location where your Google Voice number will be located and enter your Google Voice number. You must verify your phone number.

Enter the verification code. The best thing you can do is open your Google Voice dashboard. In either case, you'll receive a message or a voicemail notification.

That's it! WhatsApp has successfully recognized your Google Voice Number.
Note: Nonetheless, Google can take action against you if you violate any terms of service, including banning your account. It includes using the number for fraud, illegal activities, and more.

3. How to Use WhatsApp on PC without Number Verification?

Similar to the method of use WhatsApp without a phone number via linked devices, here is the guide how to use WhatsApp on your PC without number verification. With AirDroid Personal, the feature of Web remote control, you can easily access, manage, and view WhatsApp on your computer.

AirDroid Web are more extensive than those of WhatsApp Web. Among them are managing files, notifications, screenshots, text messages, video transfers, and remote access to files. AirDroid Web supports all Android devices and features an intuitive, easy-to-use interface. Moreover, to prevent inappropriate phone use, AirDroid Personal can help you access and restore WhatsApp content if your phone is lost or stolen.

Set up WhatsApp on your computer without number verification using AirDroid Web by following these simple steps:

Step 1. Go to visit AirDroid Web: AirDroid Web, and sign in to your AirDroid account.

Step 2. Download AirDroid Personal App on your Android mobile phone and login the same AirDroid account. Ensure permission is allowed by following the instructions.

Step 3. Connect your Android device to the app via using the QR code.

Step 4. Connect by pressing the Control button. You can access and use WhatsApp without number verification on your computer within seconds of establishing the connection.

As well as seeing and sending messages, you can also see your conversations in WhatsApp. Besides setting notifications, you can also create groups.

How to Fix Core Web Vitals Google Update Issues in Google Console


Resolving core web vital issues in Google Console is crucial for improving the user experience and search engine ranking of your website. Core Web Vitals are a set of specific metrics that Google uses to assess the page loading performance, interactivity, and visual stability of web pages.

Most common issues are:

• Spamming
• LCP issue
• CLS issue
• Plagiarism issue
• Irrelevant content production strategy issue

The most important update that made many sites lost their ranking on SERP in March was this update below:


• INP will replace FID as a part of Core Web Vitals in March 2024. Make sure that your site provides a good page experience by fixing these issues.

INP (interaction to next paint):

A metric that assesses a page's overall responsiveness to user interactions by observing the time that it takes for the page to respond to all click, tap, and keyboard interactions that occur throughout the lifespan of a user's visit to a page.

The final INP value is the longest interaction observed, ignoring outliers.

This means you will have to fix any button on your site that takes long to respond after you click, it should be fixed or the update will hit you even more.

Lastly; to all those that are happy because their site traffic is coming back should better fix all that I have mentioned above and request for Validation or risk to lose even more because the entire update should continue for like a month, and if you are hit by any Google update, is not damaged to your site, you just have to fix it and in few weeks your site will be back and better.

Here are steps to resolve core vital issues in Google Console:

  1. Access Google Console: Log in to your Google Search Console account. Select the property (website) for which you want to resolve core vital issues.
  2. Check Core Web Vitals Report:In the left-hand menu, navigate to "Core Web Vitals" under "Enhancements."Review the report to identify any issues with your website's Core Web Vitals. This report will show which URLs have problems.
  3. Identify Specific Issues:Click on each issue to get more details about the specific URLs and what Core Web Vital metric is affected. Core Web Vitals consist of three primary metrics: Largest Contentful Paint (LCP): Measures loading performance.First Input Delay (FID): Measures interactivity.Cumulative Layout Shift (CLS): Measures visual stability.
  4. Address LCP Issues:To improve LCP, optimize your page loading speed. Common fixes include: Compress and optimize images. Minimize server response times.Use a content delivery network (CDN). Eliminate render-blocking JavaScript and CSS. Implement lazy loading for images and other resources.
  5. Address FID Issues:FID focuses on improving interactivity. To address FID issues: Minimize and optimize JavaScript execution. Use browser caching to speed up resource retrieval. Avoid long tasks that block the main thread.
  6. Address CLS Issues:CLS aims to improve visual stability. To fix CLS issues: Reserve space for images and other dynamic content to prevent layout shifts. Ensure that ad elements and iframes have predefined dimensions.
  7. Verify Fixes:After implementing changes, use tools like PageSpeed Insights or Lighthouse to verify that the Core Web Vitals issues have been resolved.
  8. Re-submit Sitemap:After making improvements, resubmit your sitemap to Google Console to help Google re-crawl and re-index your updated pages.
  9. Monitor Progress:Continue to monitor your website's Core Web Vitals in Google Console to ensure that the issues remain resolved over time.
  10. Keep Up with Updates:Stay updated with Google's guidelines and algorithm changes to ensure your website continues to meet Core Web Vitals standards.

Remember that improving Core Web Vitals is an ongoing process, and it may require continuous optimization as your website evolves. Regularly check Google Console for performance data and address any new issues that may arise to ensure a positive user experience and maintain or improve your search engine rankings.
How to Manually Set Up A VPN On A Chromebook

How to Manually Set Up A VPN On A Chromebook

If you have an account with a Virtual Private Network provider, you can use it on your Chromebook too.

While most VPN companies have something you can download for Windows or Mac that is a one-click-install setup, on your Chromebook, you will need to enter the information manually.

VPN is a connection method used to add security and privacy to private and public networks, like Wi-Fi Hotspots and the Internet.

According to Android Central, before you start, check to see if your VPN Company has a app in the Chrome Web Store. But if your VPN Company does not have a Chrome app, here is what you will need to do.

Importing Certificates

If your VPN provider uses a CA certificate for a connection, you will need to import it into your Chromebook.

· Get the CA certificate from your VPN company. A CA certificate is a key that verifies your trust, and your Chromebook already has a number of them installed for web services. You will need to import the one you were given from your VPN provider if you were given one. Store this file on your local storage so that you can import it.

· Open a new tab in the browser and put chrome://settings/certificates in the address bar, then press enter.

· Click the ‘authorities’ tab at the top of the pages.

· Press the ‘import’ button and choose the file you downloaded.

· A box will open asking what you trust this certificate to verify. If you are unsure, you can leave everything unchecked (recommended).

· The certificate will import and install.

· Use these same instructions to import a user certificate if you are provided with one. Simply choose the user certificates tab instead of the authorities tab.

· Enter the VPN network settings.

Next, you need to enter the account and server information you will use to connect. You will do this in the setting as well.

· Click your account photo in the lower left of the screen, then click the gear icon to open the settings.

· Near the top, in the ‘network’ section, click the ‘add’ connection button.

· Click ‘add openVPN /L2TP.’

You need to fill in the information about your connection in the box that opens. If your Chromebook came from your work or your school, you will need to get this information from the person who administers your Chromebook. Otherwise, you will find it at the VPN provider’s website.

· Server hostname: The name or IP address of the server you will be connecting to.

· Service name: The connection name that shows in the setting. You can name it anything you like.

· Provider type:

* Select L2TP/IPsec + Pre-shared key if you need to enter a second password once you log-on to your VPN.

* Select L2TP/IPsec + user certificate if you have a separate user certificate as mentioned above.

* Select open VPN if neither applies to your VPN connection.

· Pre-shared key: Enter the secondary password you need to connect here. If you don’t need to use a second password, leave this blank.

· Server CA certificate: If you installed a CA certificate as described above, choose it from the list. Otherwise, leave it at default.

· User certificate: If you installed a user certificate as described above, choose it from the list. Otherwise, leave it blank.

· Username: The username you use to log in to your VPN.

· Password: Your VPN account password. Note this is not the same as the pre-shared key.

· OTP: If you were given a token or website address that generates a one time password, generate it and enter it here, otherwise, leave it blank.

· Group name: If you need to enter a group name it goes here, otherwise, leave it blank.

· You can check the box to save identity and password if you want to be able to connect with one click. If you prefer to enter your username and password each time, leave this unchecked. Your pre-shared key will be remembered either way.

· To test your connection, click ‘connect.’ You will know you are connected when you ass a key symbol beside your Wi-Fi icon. You will also see the word connected in green at the new connection in the setting window. If you are connected without any problems, you can click the back arrow in the upper right to see other configuration options, like a setting to always use the VPN connection or delete (forgot) it, or edit it.

If you choose not to use the connection all of the time, you can connect by clicking the network icon (the Wi-Fi symbol) in the tray and choosing your new network.

Use an Android app

If your Chromebook supports Android applications, you may have a much easier time of getting your VPN service working. Just download the VPN provider’s app, and set things up like you would on your smartphone. Be warned: some VPN applications may not be perfectly optimised to run on Chrome OS: ProtonVPN kept crashing whenever I tried to open it.

Tunnelbear worked, and switching the service on in Tunnelbear’s app registered perfectly fine with the operating system. Once the service was started, I could then disconnect and reconnect from the quick settings menu in the lower right corner of the display.

What do you think of the article? Leave a comment below

Thank you for reading our article, we hope to see you here again.
Instagram Marketing: 7 Instagram Marketing Tips That Actually Work

Instagram Marketing: 7 Instagram Marketing Tips That Actually Work

As more and more users sign up on Instagram, this makes it one of the most popular social media platforms. This means it has a lot of potential when it comes to marketing. Truth be told, with the right approach, you can maximize your influence and optimize your number of Instagram followers. The following tips are actionable strategies that can help you in this respect.

Switch to a Business Profile

If you’re using Instagram for the sole purpose of marketing, this is a must. The main benefit of doing this is that for one, followers may directly contact you from your firm’s account page. Secondly, you can create and publish ads, while having access to Instagram’s analytics tools – Insights. These provide useful statistics concerning the reach of every post.

Make Sure All Your Posts Are Related to Your Business

When you don’t have a plan, being carried away is likely to happen. This is why you should plan your posts accordingly, making sure that all the information you share is relevant to your story and what you want to promote through your business.

Post Product Teasers

Did it ever occur to you that you could actually maximize your sales by doing something as simple as posting product teasers? This strategy is actually entailed by most major companies. And the reason why it’s so popular is quite evident: it works. The thing with product teasers is that they aren’t too pushy so that your followers get frustrated, but they actually increase excitement.

Use Instagram Stories

The release of the Insta story feature triggered a lot of buzz; it comes as no surprise that many users want to view Instagram stories anonymously – they are catchy, raw and real. And whoever thought that Instagram Stories are solely designated for individual users was wrong. Businesses can take advantage of this feature, as well. The benefits are unparalleled. For example, Stories allow you to deliver behind-the-scenes kind of content. The purpose of these posts is to spike your followers’ interest and curiosity.

Use User-Submitted Photos

Many brands utilize user-generated content in order to promote their products. What you should do is tell your base of followers that their posts will be tagged if their photos are chosen for regram. Since most users want to grow their accounts, this approach is likely to have a high rate of success – not to mention that it is a win-win kind of scenario for both you and your customers.

Use a Branded Hashtag

Aside from using hashtags with every post you submit, creating a unique, branded hashtag will also increase your visibility. Each time a user posts a photo that comes accompanied by the tag, you gain free exposure.

Post at the Right Time and Avoid Over-posting

Essentially, over-posting is a bad practice that might determine a significant percentage of your followers to unfollow your account. On the other hand, posting at the wrong hours won’t get you the visibility you need. So, determine when your followers are more likely to engage, and that should be the best time to post your content.

It goes without saying that Instagram dominates the social media world. This is why, as a growing brand, you should embrace the right marketing strategies. The ones mentioned in this post should get you on the right path.
How to Edit WhatsApp Messages after it’s sent on iOS and Android

How to Edit WhatsApp Messages after it’s sent on iOS and Android

Editing already sent messages was only achievable to do on few instant messaging platform like Telegram. 

WhatsApp is one of the most popular messengers widely used from around the world – but without the enablement to edit Edit WhatsApp Messages after it’s sent.

The feature to enable users edit WhatsApp messages after its sent has been advocated for a very long time; and guess what, It is now posible to edit your sent messages now, With the condition to edit a many times as you want within the set 15-minute time limit.

How to Edit WhatsApp Messages You already Sent on Android and iOS

  • Select the message you want to edit by pressing and holding it.
  • Tap on Edit from the message context menu (on iOS) or go to the three-dot menu at the top right corner of the screen (on Android).
  • Edit your mistakes or re-type the new message you want to send in the text field.
  • Tap the green check mark button next to the text box to save your edited message.However, WhatsApp will mark any Edited messages as edited on the message box to notify the recipient aware of the correction without showing edit history.

Things to also note about the WhatsApp feature to edit messages

  1. Only the group of persons in a group chat or an individual chat can see the edited version of your message if they run on the latest WhatsApp version
  2. You can only see the “edit” feature if you are running on the latest WhatsApp
  3. You can’t see the “edit” feature after the 15-minute time limit you sent the message you intend to edit.
  4. You can also edit WhatsApp messages on WhatsApp Web and Desktop (both Mac and Windows)

Why you need this

Nothing else but to fix your typos without leaving a trace.

How to change your Threads feed to accounts you actually follow


In this photo illustration, the Threads logo is displayed in front of a mobile phone screen for easy explanations.

Threads, the meta version of Elon Musk’s stormy Twitter, launched on iOS and Android in the UK and US on Thursday. Accessible only through Instagram, the standalone app requires you to login through your Meta account. Once you’ve signed up to Threads, you’re given the option to follow everyone you already follow on Instagram (that is, our social media identities can be quite different across platforms , may be very different from those you follow on Twitter). But even after following people you know, your Threads feed automatically defaults to a whole bunch of accounts you don’t.

Here’s how to make sure your fresh new feed is made up of people you actually follow. And if it’s getting to be too much, here’s how to stop thread notifications.

Step 1: Open the Threads app

If you haven't signed up for Threads yet, you can find it in your Instagram app's Settings — hit the three lines in the top right corner of your Instagram profile page and click Threads to install it through iOS or Android.

Step 2: Tap your Threads Profile

In the bottom left corner of the Threads app menu, tap the icon that looks like a little person to head to your Profile.

Step 3: Open Settings


Tap the two lines in the top corner of your Profile page to bring up Settings.

Step 4: Tap Notifications

Open Notifications — it has a little bell icon next to it.

Step 5: Tap Threads and replies

A screenshot showing the Threads settings page "Notifications" with "Threads and replies" about halfway down.Credit: Shannon Connellan

Step 6: Change your settings to "From people you follow"

Toggle the settings from "Everyone" to "From people you follow." You can change this for First threads, Likes, Replies, Mentions, Reposts, and Quotes. This won't change the entire feed to only people you follow (Instagram's working on that), but you'll see a lot more content from people you do.

A screenshot from the Threads app showing "Threads and Replies" and various settings for seeing content from "everyone" or "from people you follow"Credit: Shannon Connellan

Step 7: Hit the Home icon to return to your feed

If you want to change these settings back, just follow the same steps as above, but toggle "First threads" back to "Everyone".

How to Create a Threads Account or How to sign up to Threads


Threads was officially launched on July 6, the new standalone app is dedicated to "sharing text updates and joining public conversations", according to Meta. The owner of the app.

This is essentially what Twitter offered, prior to owner and CEO Elon Musk's takeover and several questionable choices unrelentingly aimed at pushing users toward a paid Twitter Blue badge verification subscription.

Built by the Instagram team and directly linked to your Instagram account, Threads allows posts that are up to 500 characters long, which can include links, photos, GIFs, and videos up to five minutes in length. That's quite a lot if you should ask me.

Threads is available for download now for both iOS and Android in over 100 countries. An alleged (and whopping) 10 million people has signed up in its first seven hours after launched. If you want to be one of them, here's how to sign up.

One pretty major thing to note, if you sign up for a Threads account and then want to delete it, Meta will also delete your Instagram account. And as always with social media platforms, Meta's is tracking you in all sorts of ways with Threads. So it's a bit difficult to quick once you signed up.

Step 1: Download the Threads app.

On either your iPhone or Android, open the Google Play store or Apple Store on your phone. Search "Threads" and hit download. The app is free. (You can also find a direct link in your Instagram app — tap the three lines in the top right corner to open Settings, then click "Threads", which will take you to your app store.)

Step 2: Log in with Instagram.

When you open the Threads app, a button at the bottom of the screen will guide you to log in with your Instagram account. You can switch between Instagram accounts, choosing which one to use, if necessary.

Step 3: Create your profile.

From there, you'll be asked to create a profile, with a picture, a bio, and the option to add links. You can also import your info from Instagram, so whatever is in your current Instagram profile automatically migrates to Threads.

Step 4: Decide whether you want your profile to be public or private.

Threads will then ask you to choose between public and private profiles. With a public account, anyone on or off Threads can see your content. If private, your account will only be available to approved followers.

Step 5: Follow accounts.

You can either instantly follow all the accounts you already follow on Instagram, or choose who to follow manually. If you follow someone who isn't on Threads yet, they'll appear as "pending" until they've joined.

Step 6: Start exploring


Your account is now ready to go. You can browse through the home page, follow more accounts, and post your own Threads. If your feed is full of accounts you don't follow, you can change the settings using this guide. Let's see how it all works out.

Now you're signed up, Congratulations.......
How to get verified on Instagram Threads with No Cost

How to get verified on Instagram Threads with No Cost

For brands and social media creators on other media, getting verified is the greatest form of validation. Securing that “blue tick” not only validates your authenticity, it gives you more control over your online presence by ensuring your profile is the only one representing your brand.

Now, getting verified on Threads is not easy, and it’s not something that everyone is able to do. But if you want to earn this recognition, this article will guide you on how to successfully apply for and receive the coveted verification badge on Instagram Threads.

Let’s get started.

Like Twitter and Instagram, Threads allows users to become verified to confirm their identities and access some exclusive features. Similar to Twitter's verification process, you'll need to pay a monthly fee to be verified on Threads, so keep that price in mind as you get your verified Threads account set up.

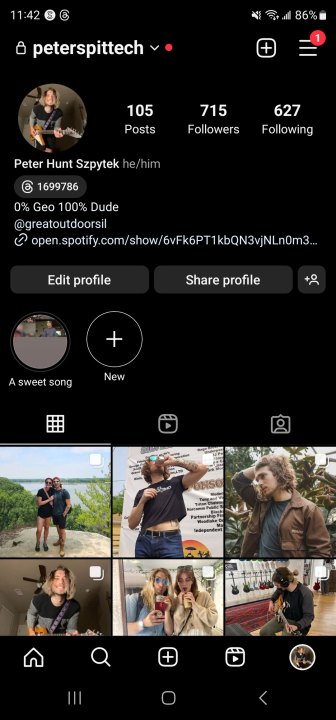
Step 1: In order to be verified on Threads, you'll need to first make sure you have an account. With your account made, you won't actually be able to get verified via the Threads app. Instead, you'll need to open the Instagram app and navigate to your profile.

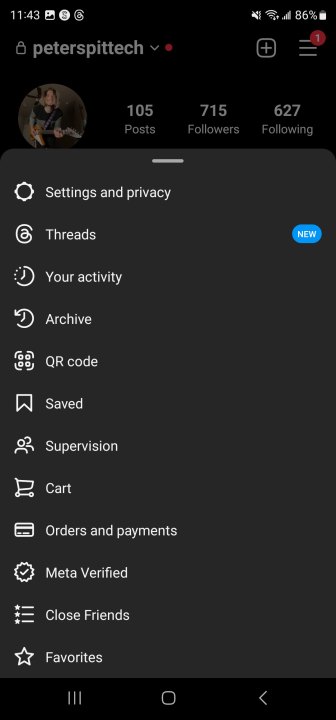
Step 2: Once you've made it to your profile, select the icon in the top right corner (the three horizontal lines) to pull up a menu.

how to get verified on instagram threads verified1
Related

Step 3: In the menu, select Meta Verified.

how to get verified on instagram threads verified2

Step 4: Once you've selected it, you should be taken to the Meta Verified menu in the Meta Accounts Center, but if you aren't automatically taken there, select Meta Verified once more at the bottom of the screen. On the Meta Verified menu, you'll be able to see all of the features that come with being verified. Select Subscribe.

how to get verified on instagram threads verified3

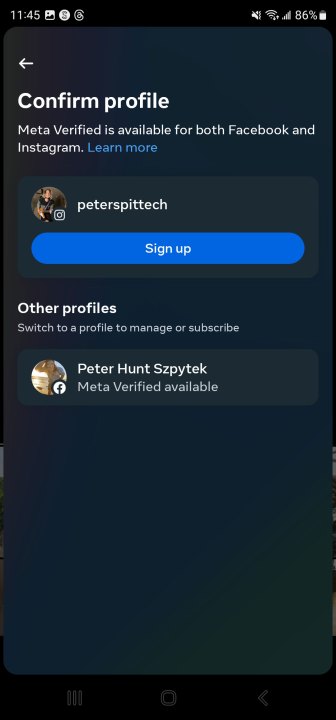
Step 5: On the next page, confirm that the profile listed is the profile you want to sign up for the Meta verification process. Once you have, select Sign up.

how to get verified on instagram threads verified4

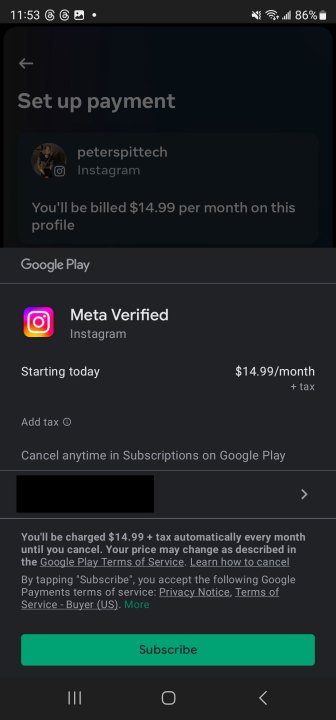
Step 6: Review the payment information on the new page. To subscribe to Meta Verified, you'll pay $15 per month, which will be billed to the card on file. If you're okay with paying that, select Pay now and then select the card you want to pay with that's associated with your app store of choice. If you don't have a card on file, you'll be prompted to enter one. Once you've found your card, select Subscribe.

how to get verified on instagram threads verified5

Step 7: Once you've subscribed, it will take Meta up to 48 hours to review your profile to make sure that you qualify for its verification process. Take note that in order for Meta to verify you, you need to have your full name on your profile, have a profile picture that clearly shows your face, and have 2FA enabled. If, for some reason, Meta does not accept your verification request, you will be refunded.

As soon as your verification application is accepted, you'll be verified on your Meta accounts, meaning you'll get the blue checkmark on Instagram and Threads. Take note that this will not verify you on Facebook.

Is getting Threads verified worth it?

There’s a lot of planning and effort involved in Threads verification, so make sure you have a good reason before you get started. Fortunately, there are plenty of benefits to being verified, from better brand credibility to a stronger social search presence.

Threads verification differentiates you from the crowd and makes it easier for you to reach the people that matter most to you. Used correctly, it makes you more trustworthy on social media and boosts your conversion rates. All you need to do is show that you’re worthy.

POS Operators Announce New Charges for Customers Deposit and Withdrawal

POS Operators Announce New Charges for Customers Deposit and Withdrawal

PoS operators in Lagos have announced new deposit and withdrawal charges that will be uniformly implemented. The uniform fee structure is aimed at addressing the charge disparity currently ongoing since the CBN naira redesign policy.

A task force has also been set up to ensure compliance among PoS operators and encourage compliance to the new fee structure

The Association of Mobile Money and Bank Agents in Nigeria (AMMBAN), Lagos State Chapter has released a unified price list (charges) for Point of Sales (POS) operations in the State.

The price list was unveiled at the 4th Annual AMMBAN Lagos Symposium themed “the impact of cashless policy on mobile money & agency banking.Why the new price list

Abiodun David, the chairman of AMMBAN Lagos State Chapter, said the new price list is aimed at curbing extortion by POS agents on the general public and is also a reflection of the present economic situation in the country.

He further explained that while POS agents are permitted to go below the price list depending on their area, they are not allowed to go above the price list, as reported by CEM.

Furthermore, at the meeting, Ogungbayi Ganiyu, the General Secretary of AMMBAN, stated that efforts are being made to communicate the changes to the Central Bank of Nigeria.

Legit.ng understands that since the implementation of the CBN's naira redesign policy, which resulted in a cash shortage in the country, there has been a disruption in the operation of POS agents.

While many have reverted to the charges prior to the scarcity of naira notes, there are still some who continue to charge higher than the previous rates.

AMMBAN categorized the price into deposit and withdrawal.

Deposit

N1,000 and N4,900 will pay a service charge of N100.
N5,000 and N10,900 will attract a service charge of N200.
N11,000 and N20,900 will incur a service charge of N300.
N21,000 and N30,900 will have a service charge of N400.
N31,000 and N40,900 will be subject to a service charge of N500.
N41,000 and N50,000 will attract a service charge of N600.

Withdrawals

N1,000 and N2,400 will now attract a service charge of N100.
N2,500 and N4,000 will incur a service charge of N200.
N4,100 and N6,400, customers will now be charged N300.
N6,100 and N7,400 will now attract a service charge of N400.
N7,500 and N10,900 will incur a service charge of N500.
N11,000 and N14,400, a service charge of N600 will be applied.
N14,500 to N17,900 will be subject to a service charge of N700.
N18,000 and N20,000 will now attract a service charge of N800.
Facebook Live Unable To Find Camera For Live Streaming

Facebook Live Unable To Find Camera For Live Streaming

Google’s Chrome browser remains the biggest dog in the industry in terms of market share.

According to countless reports, Google Chrome users are unable to use Facebook Live due to an error with the browser being unable to access the system’s camera and microphone.

Many of the affected users have gone through the basic troubleshooting process for such an issue; granting the website permission to the camera and microphone, allowing Windows to let third-party applications use the microphone and camera, but all to no success.

Earlier today, I decided to try a Facebook Live OBS trick to stream a video on my laptop to Facebook. Unfortunately, whenever I try to go live on Facebook from the computer, it keeps telling me that Facebook is unable to find camera despite the fact that the inbuilt webcam of the laptop is working fine. I tried my external login tech webcam too, same story.

After Googling what might be the cause, I stumbled on a trick which fixed the problem. Hence, I’ve decided to share it with you, hopefully it might be useful to you too. All I did was to set the default camera in chrome settings.

How?

Navigate to “Settings”

Scroll down and click” Show advanced settings”

Or use the short-cut CTRL+F on your keyboard and search for privacy or security and you will easily find it.

Go to “Privacy and security” and click on “Site Settings”

Scroll to Camera and select the camera you are using from the drop down. Also ensure you select the “ask when as it requires access to your camera”

Click “done”

Once you’ve done all these things, restart Chrome one more time, go to your Facebook page, click on “Live Video” and select “Camera” and you Re-try the Facebook Live and everything should be fine now, you have the option on the bottom left to Go “Live”.

I hope this helps you all. I know how frustrating it is and wanted you to benefit from my stupid hours of trying and errors and finally get this fixed and having success.

Please leave a comment below and share your experience with us.

#GoogleChrome #FacebookLivenotworking #issuetroublesusers #facebooklive #facebookliveunabletofindcamera

How to remove Password from Bank statement PDF file?

Why is my bank statement PDF password protected?

To avoid unauthorized access, the bank usually protects the statement by applying a password to it. The password is generally made up with your personal details so that only you can open the file.

Removing the password from PDF bank statement file has never been this easy before. You just have to make a few clicks to remove the password. This can be done with your very own favorite browser "Google Chrome". In order to remove password to view the PDF file with the help of Google Chrome you need to follow this simple step below:

Protecting your personal document or identity online is so crucial that I cannot stop talking how important it is in this century most especially this our internet era where the whole world is computerized and your document could land in the hands of thieves or fraudster who could take advantage of miss spelling or wrong email address. The password is essential so that we can be protected from third party from unauthorized or to prevent fraud and access to our personal data.

Most people on monthly basis receive a bank statement in PDF format which is protected with password. This is done for the security purposes so that your personal information cannot be viewed or copied by others. It might be troublesome to enter the bank statement password every time you want to view or edit it. In this tutorial, I will show you what you need to do to remove password from PDF bank statement so that you don’t have to enter password every time you want to view it.

If you know the password of your PDF bank statement and would like to enter it every time you want to view it then no problem but if you just want to spare yourself the trouble of entering it every time, you can follow the method on this tutorial.

How to Remove Password from PDF Bank Statement By Google Chrome

Removing the password from PDF bank statement file has never been this easy before. You just have to make a few clicks to remove the password. This can be done with your very own favorite browser "Google Chrome". In order to remove password to view the PDF file with the help of Google Chrome you need to follow this simple step below:

Step 1: Right click on the encrypted PDF document and from "open with" menu select "Google Chrome".


Step 2: Enter the correct password in the prompted box to open the PDF file in Google Chrome.

Step 3: Click on the "Print" icon in the top right corner. From "destination" section in the left menu, click on the "Change" button.

Step 4: Then select "Save as PDF". Finally click on the "Save" button to save the unlocked PDF file. Now you will be able to edit, modify and print the contents of your desired PDF file without entering the password.


Please note:

Google Chrome is a very simple method to remove PDF document password so that we can open and edit it freely. However, this method won't be workable if your original bank statement is restricted from printing because the way Google Chrome achieves this goal is printing the original pdf to save a new copy of the pdf, which is clear of any restrictions, thus convenient for our daily use.

How do I remove password protection from PDF?

You can remove the password from a PDF file but you must know a password to open it once. By using the print feature on chrome browser you can remove password from PDF using computer and android phone.

Feel free to leave a comment below and share your thought with us. Do you have any trouble with the above tips? Don’t forget to share this post with your friends on social media.

22 Secret & Hidden Tips for Android Users (2023)

22 Secret & Hidden Tips for Android Users (2023)

Android is a remarkably powerful, innovative mobile operating system that frequently leapfrogs Apple’s iOS in new technology support. That state-of-the-art functionality makes for a complex, sprawling operating system. At the surface level, the interface is simple enough for casual users who just want to text, make calls, and use apps, but hidden a layer or two deep in the interface are power-user-friendly settings and tools. You just need to know where to look.

1. Settings Search Bar 

Settings now has its own dedicated search bar. While this may seem like a very minor addition, it’s actually a great timesaver when you know exactly what you’re after. For example, let’s say you want to change your network settings, but you don’t know where to look. Just head to settings and search for “network” and you’ll find what you need almost instantly. This is one of many neat little features in Lollipop that really helps to increase efficiency in a simple and intuitive way.

2. Swipe Twice For New Notification Bar

Lollipop comes with a new notification bar - simply swipe down once from the top of your screen to look at your notifications and swipe down once more to access your quick settings. As in previous versions, it’s still possible to access your quick settings with a little more speed by swiping down with two fingers instead of one. From here you can access all the usual and familiar Android features, with a few new options introduced with the new OS, such as flashlight.

3. Flashlight 

Android finally has its own built in flashlight button, which can be found in your notification screen. This feature, which has been on iOS and Windows Phone for some time now, uses your phone’s LED flash as a torch at the touch of a button. Previously, Android owners were forced to download a separate flashlight app, which if you’re upgrading, you can probably go ahead and delete now unless you’re after specific third party features, such as strobe lighting or timed flash effects.

4. Data Usage Notification

This is a handy feature if you’re on a strict data plan and you have a tendency to go a bit overboard. Use the two fingered downward swipe to access your quick settings before tapping on your phone’s signal symbol. A new screen will appear displaying the amount of mobile data you’ve used. Tap More Settings and you can set a specific data warning as well as a data limit, making it almost impossible to veer outside of your contract and saving you from racking up some unsightly bills. For instance, if you have 5GB of data a month, you can set the warning at 4GB and the limit at 5GB. Once you reach 5GB of data usage, your phone will turn off all data.

5. Hide Or Disable Sensitive Notifications

Notifications have received a lot of special attention in Lollipop. Not only do you have more control over them (such as double tapping to open the app associated with the notification), but they’re now also displayed on your lock screen, allowing you to see what’s happening on your phone at a glance. The downside to this however is that so can anyone else. If you’re receiving notifications that display sensitive content, you can make sure this is kept hidden until you enter your passcode. Just head to Settings > Sound and Notifications and under the setting that says ‘When device is locked’ select ‘Hide sensitive notification content’. You can also hide all notifications if you wish.

6. Long Press To Remove Notification Spam

With a lot of apps come a lot of notifications. Sometimes these are helpful, such as weather updates or chat notifications, but other times they’re a pain in the neck, such as software updates or intrusive games urging you to buy upgrades. Next time you receive a notification you don’t want, tap and hold it until a small ‘i’ appears on the right hand side. Tap the ‘i’ button and you can either block the app from sending notifications in the future, or set it as a priority, so that it’s always at the top of your list and will come through even when your phone is set to silent.

7. Do Not Disturb

Lollipop’s do not disturb features are incredibly easy to set up. Turn your volume up or down using the rocker switch on the side of your device and a small window will pop up with the options None, Priority and All. Tap None and no notifications will wake up your phone, this includes calls, texts, updates and even alarms. Tap Priority and only specific interruptions will be allowed through - to set these up, tap the little cog wheel on the top right hand corner. Finally, All will allow all notifications to come through. Each of these setting can be assigned to work for a specific amount of time or indefinitely.

8. Create Profiles, Limit Functionality

You can now create custom and guest profiles in the latest Android update. Swipe down on your notifications bar and tap the profile icon in the top right hand corner to view the user profiles currently available. If you haven’t used this before, you will see your own profile and the option to log in as a guest or create a new profile. Logging in as a guest is a quick way to share your device with limited functionality - perhaps if you’re loaning your phone to a friend or a co-worker for a few hours. Creating a new profile however will provide the user with their own space, which can be customised with more features that are not available in a guest profile.

9. Pin Your Screen

While separate user and guest profiles are great for loaning your phone to friends, it’s possible to limit the functionality of your device further by pinning your screen. Go to Settings > Security and turn Screen Pinning on to activate this feature. Now you can pin a single app to your screen by switching to the multi-task view and selecting the green pin button on the bottom right corner of your selected app. The specified app will stay open while all other functionality on your phone will be disabled unless you type in your passcode. This is great if you wish to lend your phone to someone who wants to make a quick phone call or search for something online, but you don’t want them nosing through your device.

10. High Contrast Text

A number of experimental features have been added to Lollipop. One of these includes the introduction of high contrast text. Head to Settings > Accessibility and you’ll find it under the System sub-heading. The effect is actually quite subtle, but if you’re struggling to read some of the text on your Android device, it could make all the difference. At the time of writing, it doesn’t seem like all of the text is affected. However, this is marked as experimental, so various inconsistencies should be expected.

11. Colour Inversion And Colour Correction

If you’re colour blind or your vision is impaired then these features could improve your experience with Android’s new OS. Go to Settings > Accessibility and scroll to the Display sub-heading at the bottom. Turning Colour Inversion on will dramatically change the look of your device and may be more soothing on the eye for some people. Selecting Colour Correction will allow you to choose from three different colour modes - Deuteranomaly (red-green), Protanomaly (red-green), Tritanomaly (blue-yellow) - which may be beneficial to some colour blind users. As with the high contrast text, this is an experimental feature and may slow down your system.

12. New Lock Screen Swipe Options

The lock screen has undergone some small but pleasing changes with the introduction of Lollipop. You’ll notice there are now three icons at the bottom of your screen when you wake up your phone. These include a phone, a padlock and a camera. Swipe directly upwards and you’ll unlock your phone just as you normally would. However, swipe from left to right and you’ll not only unlock your phone, but you’ll be taken to your contacts list. Swipe from right to left and you’ll go straight to your default camera app. These features are fairly minor and hardly ground-breaking, but they’re a nice addition that can really help to increase overall efficiency.

13. Battery Saver

The battery screen will not only give you the usual handy breakdown of what’s draining the most juice from your system - complete with a swanky looking graph and an approximation of how long you have left until your phone dies - but it now has a very effective battery save feature. You can get there by swiping downwards from the top of your screen with two fingers and tapping the battery icon before tapping the three dots in the right hand corner and selecting Battery Saver. Turn this on and it will attempt to reduce your device’s battery usage by limiting vibrations and most background data. Additionally, apps that rely on syncing may not update unless you open them. This feature turns off automatically when you charge your phone.

14. Unlock Your Phone With Your Face

This is not a new feature and frankly, a bit stupid. However, it seems to be more reliable than in previous versions of Android, it’s a lot of fun and opening anything with your face feels very cool and futurey, so to hell with practicality. Go to System > Settings > Smart Lock and select Trusted Face. Go through the on screen instructions and before you know it you’ll be accessing your phone with your gorgeous looks. Please keep in mind however that this is a bit of a gimmick. Face matching is less secure than a password, pattern or four digit PIN and if anyone looks like you, they can potentially unlock your phone.

15. Cast Your Screen Via Chromecast

If you’ve been using Google’s simple but brilliant Chromecast - a small media streaming device that plugs into the HDMI port on your TV, essentially turning it into a (slightly) smart TV - then you’ll be pleased to know Android has made it even easier to operate. Previously you’d have to download an app in order to cast your device to your TV, however this functionality is now built into Lollipop. Just double swipe down to access your notifications bar and select the Cast button. Your device will automatically detect your Chromecast and you can begin casting instantly.

16. Access Alarm Quickly

Once you’ve set your alarm, you can now access it from the notifications bar. Drag down from the top of your screen twice (or use the two finger method) after you’ve set your alarm and you’ll notice a new clock icon, which will display the time at which your alarm is set to go off. Not only does this mean you won’t have to go back into your clock app to make sure you set the correct time, but if you tap it, it will take you directly to the app, where you can change any settings as you normally would.

17. Wake Your Phone With Your Voice

From your home screen swipe left into Google Now, tap the three bars in the top left hand corner and head to Settings > Voice > “OK Google” Detection. From here you can turn voice detection on, which will work even when your device is locked and the screen is off, allowing you wake your phone or tablet by simple shouting “OK Google”. However, a word of warning - according to Google, when using voice activation commands or touching a microphone icon, a recording of the next thing you say, plus a few seconds before, may be used and stored by the search giant and associated with your Google account to help recognise your voice and improve speech recognition. If that makes you uncomfortable, you might want to make sure this is turned off.

18. Tap and Go

Transferring your contacts and details from one phone to another can be incredibly tedious, but if you’ve bought yourself a new Nexus 6 this year, there’s a quick and easy solution. On booting up your phone for the first time, it will ask if you would like to take advantage of Tap and Go. Tap yes and hold your old Android phone against the back of your new one. All of your data will be transferred across to your new phone via Bluetooth, saving you the hassle of potentially manually installing large swathes of apps and typing in missing contact details.

19. Apps Remain After Reboot

Here’s another small feature from Lollipop that’s so useful, you’ll wonder how you lived without it. Ordinarily, any apps you have open will be completely closed and shut down when you reboot your phone, which is particularly annoying if you’re working on a lot of different things at once. However, Lollipop now solves this issue with their new Overview screen (this used to be called Recent Apps), which retains all of the apps you were using, even after a reboot. You can access the Overview screen by tapping the square button on the bottom right hand corner of your device.

20. 5.1 Surround Sound

To get the best available sound quality from your device open Google Play Movies & TV, tap the three bars on the top left hand side of the screen, select Settings and tick Enable Surround Sound. This will now activate 5.1 surround sound whenever it’s available. If you’re dubious, there’s even a demo you can play to test the quality, which is just below the Surround Sound setting.

21. Remove Download Clutter

Whenever you download an app on Android, it will automatically place it on your home screen. A lot of people don’t like this as it can cause a lot of unnecessary and extremely disorganised clutter. To disable this, open the Play Store, tap the three bars in the top left hand corner, select settings and uncheck the ‘Add icon to Home screen’ setting.

22. Get Help During Emergencies

No one wants to be in SOS situations, but accidents happen. The best we can do is prepare for them, and Android gives you essential tools for those circumstances. Emergency SOS is a series of safety features that can summon help to you in dire situations, and only takes a few minutes to set up. Add emergency contacts to your device via the Safety & Emergency tab in Settings (you must have at least one). Afterward, navigate to Safety & Emergency > Emergency SOS, and click the slider to toggle on this feature.

With this active, clicking the Power Button five times or more triggers a loud alarm, call emergency services, or both depending on your preferences. Your emergency contacts will receive updates about your current location, battery status, and recent call activity.